
Grade 1 door contacts are intended for use with UK/EU BS EN 50131 Grade 1 designed intruder alarm systems. Grade 1 is the lowest graded level of security system, and these can still be bought and installed in low risk domestic premises. Grade 1 equipment is also widely available in the DIY market, These devices roughly equate with the domestic offerings for BS 4737 compliant systems and so are generally simpler to install and are more familiar to the casual installer. It should be noted that door contacts conforming to BS 4737 (and BS EN 50131 Grade 1) do not have a tamper switch included as contacts conforming to BS EN 50131 Grade 2 and above do, however the cable itself should still be tamper protected.
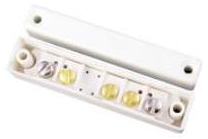
This is done at the contact end of the cable by connecting the tamper circuit wires together on one of the spare door contact terminals (the brass coloured ones in the example below).
Door contacts are often seen on the inside of the perimeter doors and to a lesser extent on windows of a secured property and are employed to monitor entry and exit operations as well as intrusion.
Door contact concept
The idea behind door contacts is that a glass reed switch, (which is fitted inside the block which has the terminals on the back) is installed on or in the door frame, and the magnet (fitted in the other block) is installed on the door. These should both be in very close proximity and alignment when the door is closed, and should move rapidly apart when the door or window is opened. When the door is closed, the magnet holds the glass reed in the closed-circuit position. When the door is opened, the magnet is removed from the glass reed, which reverts to it's open circuit state, triggering the alarm.
Of course there are several different types of BS 4737/Grade 1 contacts, but these can usually be split into one of two main categories:- surface, or flush. We will take a look at several types and how they are fitted.
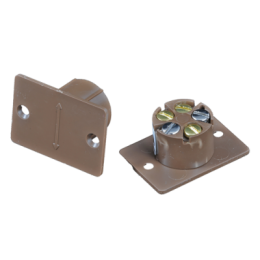
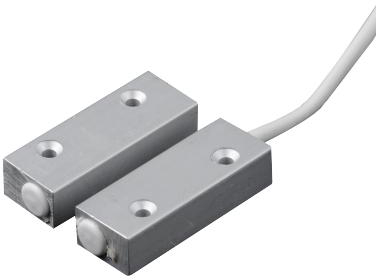
Surface white / brown Grade 1
These contacts are available in standard or heavy duty versions. In the case of the standard contacts shown above, one of the two alarm zone wires connects to each of the silver coloured terminals. The brass coloured terminals are spare terminals which can be used for tamper circuit termination or other circuit joints. Some (though not all) of these contacts have directional arrows moulded in to aid installation, as the glass reed switch within the contact may be mounted closer to one edge of the unit.
Ideally the magnet should be mounted on the lock/handle edge of the door, the contact should be installed as close to the door frame edge as possible, for minimum gap between magnet and reed, and align exactly. Alarm zone cabling should be hidden as much as possible and routed for minimum damage to building and cable.
Flush white/brown Grade 1
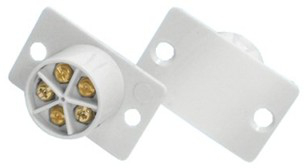
These contacts are also available with a metal front plate. In the case of the standard plastic flush contacts shown above, one of the two alarm zone wires connects to each of the silver coloured terminals. The three brass coloured terminals are spare terminals which can be used for for tamper circuit termination or other circuit joints. Some (though not all) of these contacts have a line moulded into the face of the contact and magnet front plates to aid alignment during installation.
Ideally the magnet should be mounted nearest on the lock/handle edge of the door, centrally across the width of the door on the door top or edge, and the contact, mounted in the door frame, should align exactly with the magnet when the door is closed, for minimum gap between magnet and reed switch. Alarm zone cabling should be hidden as much as possible and routed for minimum damage to building and cable.
The flush contact requires more tools and installation skill than a surface contact. On a wooden door/frame, a 20mm hole should be drilled for magnet and contact, only after marking and checking all positioning measurements. Sometimes the gap between door and frame requires that the face plate be flushed on the door and frame. Some installers insist that this is best practice. To do this neatly you will require a minimum of a hammer, craft knife and a sharp chisel, along with basic woodworking skills.
Roller door Grade 1
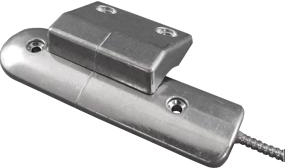
These contacts are usually fitted on warehouse and shop shutters and require a junction box to terminate the pre-wired contact. The junction box should have an integral anti-tamper feature, which should be incorporated into the tamper circuit. In the case of the contacts shown above, the magnet (the smaller of the two parts) is bolted or screwed internally to the metal shutter bottom at one end. The contact is fixed to the floor in such a way that it aligns with the magnet as shown above when the roller shutter is closed. Some contacts -like the one shown above - have alignment stripes moulded into them to aid alignment. The pre-wired armoured lead should be clipped and terminated in a junction box, which should be fixed to a solid surface. All connections to the alarm zone cabling should be carried out there. Alarm zone cabling to the junction box should be contained within conduit or mini-trunking to avoid damage. Roller door contacts can be ordered with armoured leads of different lengths, and are available with different magnet orientations to cover most applications.
Patio door Grade 1
These contacts are often used with sliding patio door sets. They require a junction box to terminate the pre-wired contact. The junction box should have an integral anti-tamper feature, which should be incorporated into the tamper circuit. In the case of the contacts shown above, they are installed nearest the lock edge of the door and frame. The plastic disc on the end of the contact denotes the edge that contains the magnet and the glass reed switch. As shown above, these should be mounted as close as possible, in a similar way to standard surface door contacts.